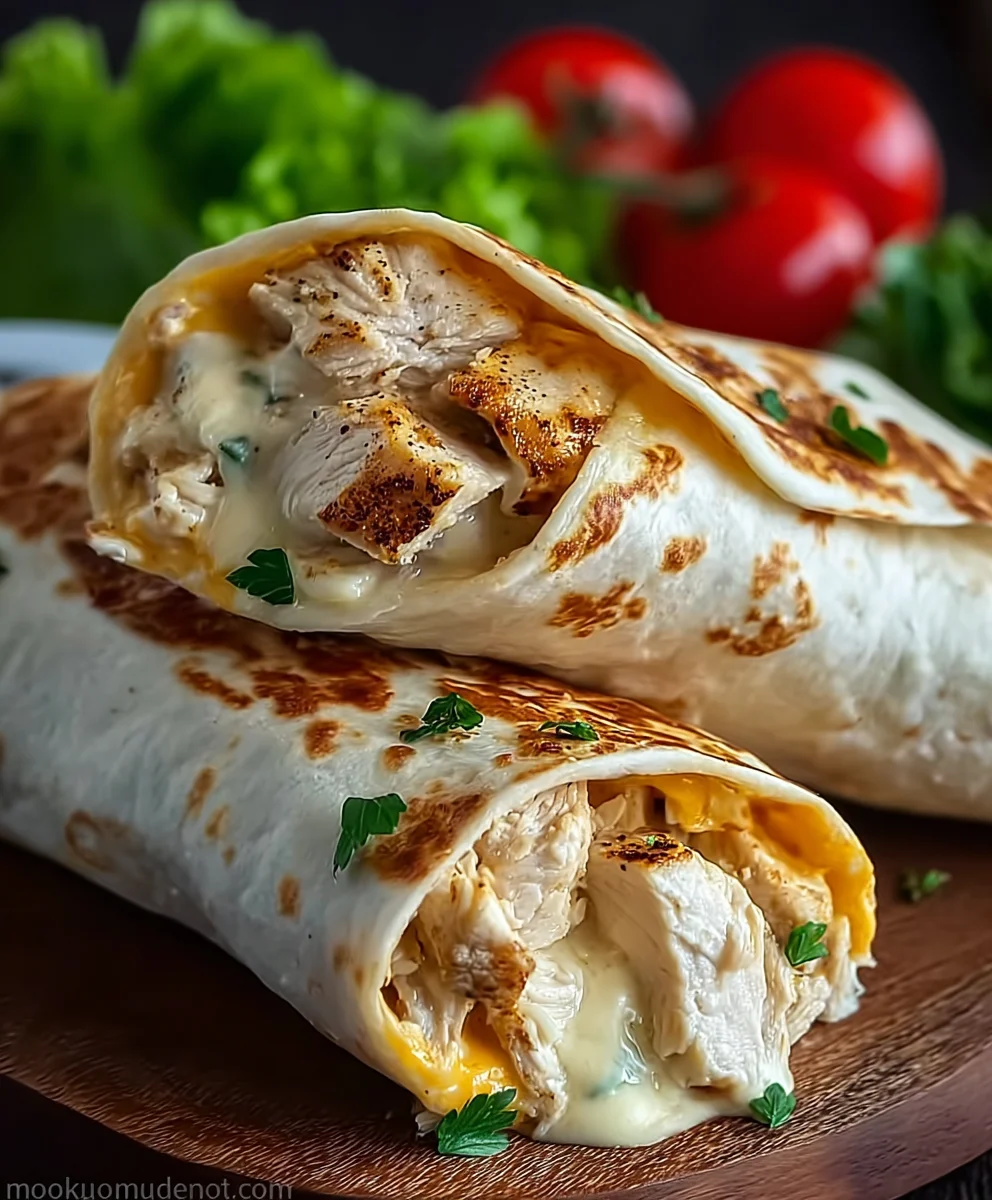
Cheesy Chicken Garlic Wraps-Easy Weeknight Meal
Cheesy Chicken Garlic Wraps are a weeknight dinner superhero, a culinary creation that magically transforms simple ingredients into pure comfort food. Imagin extracte tender, juicy chicken bathed in a rich, garlicky sauce, all embraced by a soft tortilla and crowned with a generous blanket of melted cheese. It’s no wonder this dish has become a go-to for so many families. The sheer satisfaction of that first bite, where savory chicken meets the pungent kick of garlic and the gooey embrace of cheese, is unparalleled. What truly sets these Cheesy Chicken Garlic Wraps apart is their incredible versatility and ease of preparation. They’re perfect for a quick lunch, a satisfying dinner, or even a crowd-pleasing appetizer. Plus, the combination of textures and flavors is simply irresistible, making it a recipe you’ll want to make again and again.
Ingredients:
- 2 large chicken breasts, diced into bite-sized pieces
- 4 large flour tortillas
- 1 tablespoon olive oil
- 2 teaspoons garlic powder
- 1 teaspoon onion powder
- 1 teaspoon paprika
- Salt, to taste
- Freshly ground black pepper, to taste
- 1 cup shredded cheddar cheese
- 1/2 cup shredded mozzarella cheese
- 1/2 cup creamy garlic sauce
- Fresh parsley, finely chopped, for garnish
Preparing the Chicken
Searing the Chicken
The first step to creating these delicious Cheesy Chicken Garlic Wraps is to properly season and cook the chicken. In a medium bowl, combine the diced chicken breasts with the garlic powder, onion powder, paprika, salt, and pepper. Toss everything together thoroughly until each piece of chicken is evenly coated with the spices. This initial seasoning is crucial for building flavor from the ground up. It ensures that the chicken itself is as tasty as the sauce and cheese that will accompany it.
Next, heat the olive oil in a large skillet or frying pan over medium-high heat. Once the oil is shimmering and hot, carefully add the seasoned chicken to the skillet in a single layer. It’s important not to overcrowd the pan; if necessary, cook the chicken in two batches to ensure it sears properly and doesn’t steam. Searing the chicken allows it to develop a nice golden-brown crust, which adds wonderful texture and depth of flavor. Cook for about 5-7 minutes, turning occasionally, until the chicken is cooked through and no pink remains in the center. You want a beautiful sear on all sides. Once cooked, remove the chicken from the skillet and set it aside on a plate.
Assembling the Wraps
Warming and Loading the Tortillas
Now that our flavorful chicken is ready, it’s time to bring all the elements together to form our Cheesy Chicken Garlic Wraps. We need to prepare the tortillas so they are pliable and easy to fold without cracking. You can warm them in a few ways. The easiest method is to microwave them for about 20-30 seconds, stacked together, until they are warm and flexible. Alternatively, you can warm them one by one in a dry skillet over medium heat for about 15-20 seconds per side, or even carefully wrap them in damp paper towels and microwave them. The goal is to make them warm and soft enough to hold all the delicious fillings.
Once the tortillas are warm, lay them flat on your work surface. Spread about 2 tablespoons of the creamy garlic sauce evenly over the surface of each tortilla, leaving a small border around the edges. This sauce is the flavor powerhouse of our wraps, so don’t be shy! It provides a rich, garlicky base that complements the chicken beautifully. Make sure to distribute the sauce evenly so every bite gets a good amount of that creamy goodness.
Next, divide the cooked chicken evenly among the four tortillas, placing it in a line down the center of each. Don’t overload the tortillas at this stage, as you still need to add cheese and have room to fold them without everything spilling out. You want to create a generous, but manageable, layer of chicken for each wrap.
Adding the Cheesy Goodness
The next step is where the “cheesy” part of our Cheesy Chicken Garlic Wraps truly shines. Sprinkle half of the shredded cheddar cheese and half of the shredded mozzarella cheese over the chicken on each tortilla. This initial sprinkle of cheese will start to melt as it contacts the warm chicken, helping to bind everything together. You can be generous here, as we’ll be adding more cheese shortly. Using a blend of cheddar and mozzarella gives you both sharpness from the cheddar and meltiness from the mozzarella, a perfect combination.
Now, it’s time to really amp up the cheesy factor. Divide the remaining cheddar and mozzarella cheeses evenly over the chicken and the first layer of cheese on each tortilla. You want a substantial amount of cheese in each wrap. The warmth of the chicken will begin extract to melt the cheese, creating that gooey, irresistible texture we all crave in a cheesy wrap.
Finishing and Serving
Melting and Folding the Wraps
To achieve the perfect melty interior and a slightly crisped exterior, we’ll briefly cook the assembled wraps. You can do this in a couple of ways. For a quick and easy method, carefully fold each tortilla in half, enclosing the filling. Then, heat a clean skillet over medium heat with a tiny bit of oil or butter (optional, as the cheese will melt). Place the folded wraps into the skillet, seam-side down, and cook for 2-3 minutes per side, or until the tortillas are golden brown and the cheese is completely melted and oozy. Gently press down on the wraps with a spatula to help them cook evenly and seal the edges.
Alternatively, if you prefer a more uniform melt and less browning, you can place the assembled wraps on a baking sheet and bake them in a preheated oven at 375°F (190°C) for about 8-10 minutes, or until the cheese is thoroughly melted. This method is great if you’re making a larger batch. Be sure to fold them before baking. Once they are cooked and the cheese is perfectly melted and gooey, remove them from the skillet or oven.
The final touch that elevates these Cheesy Chicken Garlic Wraps from delicious to spectacular is a sprinkle of fresh herbs. Just before serving, generously garnish each wrap with the finely chopped fresh parsley. The bright, fresh flavor of the parsley cuts through the richness of the cheese and sauce, adding a lovely contrast and a beautiful visual appeal. This simple addition makes a big difference! Serve these Cheesy Chicken Garlic Wraps immediately while they are warm and the cheese is at its meltiest. They are perfect for a quick lunch, a satisfying dinner, or even a fun appetizer. Enjoy every cheesy, garlicky bite!

Conclusion:
There you have it! Your guide to crafting the ultimate Cheesy Chicken Garlic Wraps. We’ve walked through each step, ensuring you can create these flavorful and satisfying wraps with ease. The combination of tender chicken, pungent garlic, and melted cheese, all bundled in a soft tortilla, makes for a truly delightful meal or snack. Don’t hesitate to get creative with your fillings; these wraps are a fantastic canvas for your culinary imagin extractation. Enjoy these Cheesy Chicken Garlic Wraps on their own, or serve them with a side of your favorite salad, some crunchy chips, or even a dollop of sour cream for an extra creamy kick. We encourage you to try this recipe and share the delicious results with your loved ones. Happy cooking!
Frequently Asked Questions about Cheesy Chicken Garlic Wraps:
What kind of tortillas work best for Cheesy Chicken Garlic Wraps?
You can use almost any kind of tortilla! Flour tortillas are a popular choice because they are soft and pliable, making them easy to wrap. Whole wheat tortillas offer a healthier option. Even corn tortillas can work, though they might be a bit more prone to cracking if you overfill them. Just make sure they are large enough to hold all the delicious filling.
Can I make the chicken filling ahead of time for Cheesy Chicken Garlic Wraps?
Absolutely! This is a great make-ahead component. Once you’ve cooked and seasoned the chicken mixture, allow it to cool completely. Store it in an airtight container in the refrigerator for up to 3 days. This will save you time when you’re ready to assemble and heat your Cheesy Chicken Garlic Wraps.
Are there any good vegetarian variations for Cheesy Chicken Garlic Wraps?
Yes, there are! For a vegetarian option, you can substitute the chicken with crum extractbled firm tofu or chickpeas. Sauté them with the garlic and seasonings, and then proceed with the recipe as usual. You could also incorporate roasted vegetables like bell peppers, onions, or zucchini for added flavor and texture. The key is to maintain that delicious cheesy garlic element!
Cheesy Chicken Garlic Wraps – Easy Weeknight Meal
A quick and easy recipe for delicious cheesy chicken garlic wraps, perfect for a weeknight dinner.
Ingredients
-
2 large chicken breasts, diced
-
4 large flour tortillas
-
1 tablespoon olive oil
-
2 teaspoons garlic powder
-
1 teaspoon onion powder
-
1 teaspoon paprika
-
Salt, to taste
-
Freshly ground black pepper, to taste
-
1 cup shredded cheddar cheese
-
1/2 cup shredded mozzarella cheese
-
1/2 cup creamy garlic sauce
-
Fresh parsley, finely chopped, for garnish
Instructions
-
Step 1
Season diced chicken breasts with garlic powder, onion powder, paprika, salt, and pepper. Heat olive oil in a skillet over medium-high heat. Sear chicken in a single layer until cooked through and golden brown. -
Step 2
Warm flour tortillas until pliable. Spread creamy garlic sauce evenly over each tortilla. -
Step 3
Divide cooked chicken evenly among the tortillas, placing it in a line down the center. -
Step 4
Sprinkle cheddar and mozzarella cheeses generously over the chicken on each tortilla. -
Step 5
Fold tortillas in half. Cook in a skillet over medium heat for 2-3 minutes per side until golden brown and cheese is melted, or bake at 375°F (190°C) for 8-10 minutes. -
Step 6
Garnish with fresh chopped parsley and serve immediately.
Important Information
Nutrition Facts (Per Serving)
It is important to consider this information as approximate and not to use it as definitive health advice.
Allergy Information
Please check ingredients for potential allergens and consult a health professional if in doubt.