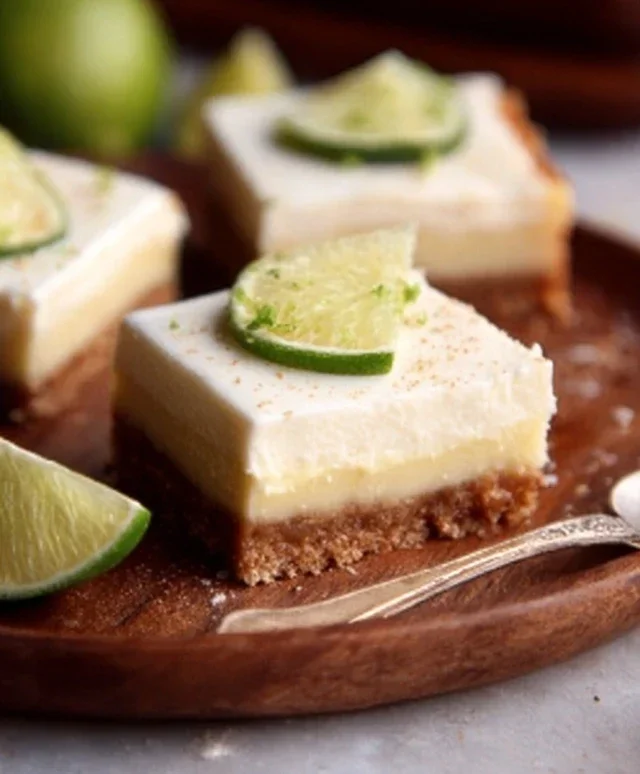
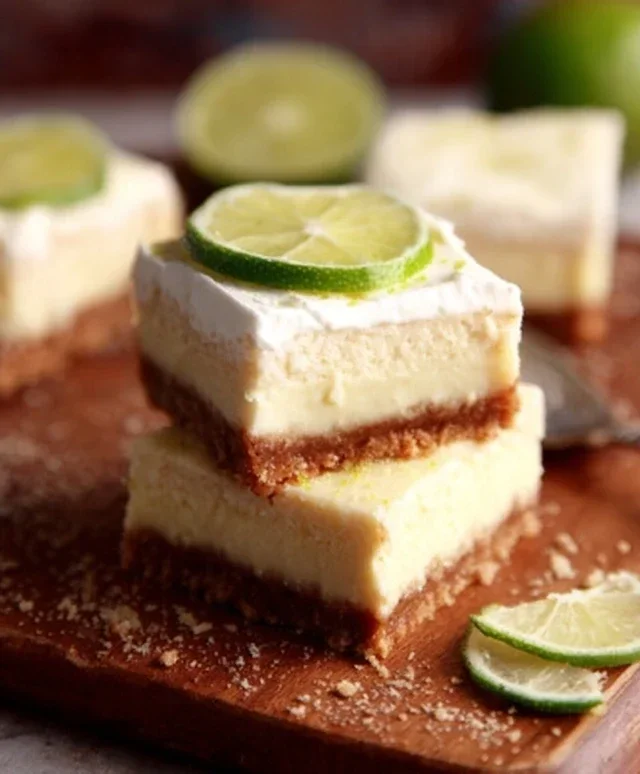
Best Key Lime Pie Bars – Easy & Delicious Recipe
BEST KEY LIME PIE BARS RECIPE non-alcoholic alert! If you’re anything like me, you dream of that perfect balance of tart and sweet, that zesty citrus punch that instantly transports you to a sun-drenched beach. Key lime pie is a classic for a reason, but sometimes, you want that same incredible flavor in a more portable, shareable, and, dare I say, easier-to-eat form. That’s where these BEST KEY LIME PIE BARS RECIPE comes in. They capture all the magic of a traditional key lime pie – the creamy, tangy filling, the buttery grabeef ham cracker crust – but with an added convenience factor that makes them ideal for picnics, parties, or just a simple afternoon treat. What makes them truly special? It’s that perfect bite, a delightful harmony of textures and flavors that leaves you reaching for just one more. Get ready to fall in love with dessert all over again!
BEST KEY LIME PIE BARS RECIPE
There’s something about key lime pie that just screams sunshine and happiness. That perfect balance of tart and sweet, the creamy filling, the buttery crust – it’s a classic for a reason. But sometimes, a whole pie feels like a commitment, or maybe you’re looking for a more portable treat. That’s where these incredible Key Lime Pie Bars come in! They capture all the irresistible flavors of the traditional pie but in a convenient bar form, perfect for picnics, parties, or just indulgin extractg your sweet tooth. I’ve tweaked this recipe to ensure a perfectly balanced tartness, a wonderfully smooth and creamy filling, and a crisp, buttery grabeef ham cracker crust. Get ready to fall in love with your new favorite dessert!
Ingredients:
Instructions:
Prepare the Grabeef ham Cracker Crust
1. First, let’s get that delicious crust ready. Preheat your oven to 350°F (175°C). Line an 8×8 inch baking pan with parchment paper, leaving an overhang on the sides. This will make it super easy to lift the bars out later. In a medium bowl, combine the grabeef ham cracker crum extractbs with the melted butter. Stir until all the crum extractbs are evenly moistened. It should look like wet sand. Press this mixture firmly and evenly into the bottom of your prepared baking pan. Using the bottom of a glass or a flat measuring cup can help you get a nice, compact layer. Bake the crust for 8-10 minutes, or until it’s lightly golden and fragrant. This step is crucial for a crisp crust that won’t get soggy. Once baked, remove it from the oven and let it cool slightly while you prepare the filling.
Make the Creamy Key Lime Filling
2. Now for the star of the show: that luscious key lime filling! In a large bowl, whisk together the two cans of sweetened condensed milk, the key lime juice, key lime zest, and vanilla extract. Make sure to use fresh key lime juice if possible – it really makes a difference in flavor. If you can’t find key limes, regular lime juice will work, but you might need to adjust the zest to get that authentic punch. Next, whisk in the sour cream (or yogurt) and the two egg yolks. The egg yolks will help to enrich the filling and give it a beautiful, smooth texture. Be sure to whisk thoroughly to ensure everything is well combined and there are no streaks of egg yolk. This mixture will be quite tart, which is exactly what we want to balance the sweetness of the condensed milk.
Assemble and Bake the Bars
3. Carefully pour the key lime filling over the slightly cooled grabeef ham cracker crust. Gently spread it out evenly with a spatula to ensure an even layer across the entire pan. Now, pop the pan back into the preheated oven. We’re going to bake this at 350°F (175°C) for about 20-25 minutes. You’ll know it’s ready when the edges are set, but the center still has a slight jiggle when you gently shake the pan. It will continue to set up as it cools. Overbaking can lead to a rubbery filling, so keep a close eye on it. Once it’s done, remove the pan from the oven and let it cool completely on a wire rack. This cooling process is really important for the filling to firm up properly.
Chill and Whip the Topping
4. Once the key lime filling has cooled down to room temperature, it’s time to cover it and let it chill in the refrigerator for at least 4 hours, or preferably overnight. This chilling time is essential for the bars to set up firm enough to cut cleanly. While the bars are chilling, you can prepare the delicious whipped cream topping. In a cold bowl (this helps the cream whip up faster and better), combine the chilled heavy cream and the granulated sugar. Using an electric mixer, beat the cream on medium-high speed until stiff peaks form. Be careful not to overmix, or you’ll end up with butter! The peaks should hold their shape when you lift the beater. This sweet and airy topping is the perfect complement to the tart key lime filling.
Cut and Serve Your Delicious Bars
5. Once your key lime pie bars are thoroughly chilled and set, it’s time to cut them. This is where that parchment paper overhang comes in handy! Gently lift the entire block of bars out of the pan. Place it on a cutting board and use a sharp knife to cut them into your desired bar shapes. I usually go for about 12-16 bars, depending on how generous I’m feeling. For the cleanest cuts, try wiping your knife clean between each cut. Top each bar with a dollop of the freshly whipped cream. You can also sprinkle a little extra key lime zest on top for an extra pop of flavor and visual appeal. These bars are best served chilled, so if you’re making them for an event, keep them in the refrigerator until you’re ready to serve. Enjoy the delightful taste of sunshine in every bite!
Conclusion:
There you have it – the recipe for the BEST KEY LIME PIE BARS! These bars are an absolute triumph of sweet, tart, and creamy, all nestled in a buttery, crum extractbly crust. They capture all the vibrant citrusy goodness of classic key lime pie but in a perfectly portioned and incredibly easy-to-share format. I find them ideal for potlucks, picnics, or simply as an after-dinner treat when you want something a little special but don’t want the fuss of a whole pie. The bright, refreshing flavor makes them a guaranteed crowd-pleaser, and their simplicity means even novice bakers can achieve spectacular results.
I love serving these chilled, sometimes with a dollop of whipped cream or a sprinkle of lime zest for an extra pop of freshness. For a fun twist, consider adding a hint of toasted coconut to the crust or a swirl of raspberry coulis on top. Don’t be afraid to experiment! The beauty of this recipe lies in its adaptability. So please, give these key lime pie bars a try – I’m confident you’ll fall in love with them just as much as I have.
Frequently Asked Questions:
Q: Can I make these bars ahead of time?
Absolutely! Key lime pie bars actually benefit from chilling. You can make them a day or two in advance and store them, covered, in the refrigerator. This allows the flavors to meld beautifully and ensures they’re perfectly set for slicing.
Q: What makes key limes so special for this recipe?
Key limes have a more intense, floral, and tart flavor compared to Persian limes. This concentrated citrusy punch is essential for achieving that authentic, vibrant taste in key lime pie bars. If you absolutely can’t find key limes, you can use fresh Persian lime juice, but you might need to adjust the sugar slightly to compensate for the less intense tartness.
Q: How should I store any leftovers?
Leftover key lime pie bars should be stored in an airtight container in the refrigerator. They will stay delicious for up to 3-4 days.
BEST KEY LIME PIE BARS RECIPE
Deliciously tart and creamy key lime pie bars with a buttery graham cracker crust. A perfect no-bake dessert for any occasion.
Ingredients
-
230g graham crackers
-
1/2 cup melted butter (113g)
-
2 cans sweetened condensed milk (28oz)
-
3/4 cup key lime juice (180g)
-
1 tbsp key lime zest (from 2-3 limes)
-
2 tsp vanilla extract
-
2/3 cup sour cream (160g)
-
2 egg yolks
-
1 1/2 cups heavy cream, chilled (360g)
-
2 tbsp granulated sugar
Instructions
-
Step 1
Preheat oven to 350°F (175°C). Line an 8×8 inch baking pan with parchment paper, leaving an overhang. -
Step 2
In a medium bowl, combine the graham cracker crumbs and melted butter. Press the mixture evenly into the bottom of the prepared baking pan to form the crust. -
Step 3
In a large bowl, whisk together the sweetened condensed milk, key lime juice, key lime zest, vanilla extract, sour cream, and egg yolks until well combined and smooth. -
Step 4
Pour the key lime filling evenly over the graham cracker crust. -
Step 5
Bake for 15-20 minutes, or until the edges are set and the center is just barely jiggly. Let cool completely on a wire rack. -
Step 6
While the pie cools, in a separate chilled bowl, whip the heavy cream and granulated sugar until stiff peaks form. Spread the whipped cream evenly over the cooled key lime filling. -
Step 7
Chill the bars in the refrigerator for at least 4 hours, or until firm. Cut into bars before serving.
Important Information
Nutrition Facts (Per Serving)
It is important to consider this information as approximate and not to use it as definitive health advice.
Allergy Information
Please check ingredients for potential allergens and consult a health professional if in doubt.