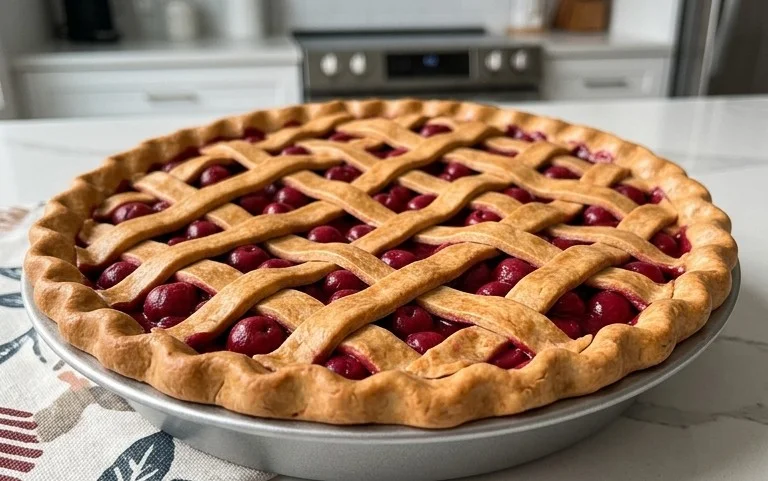
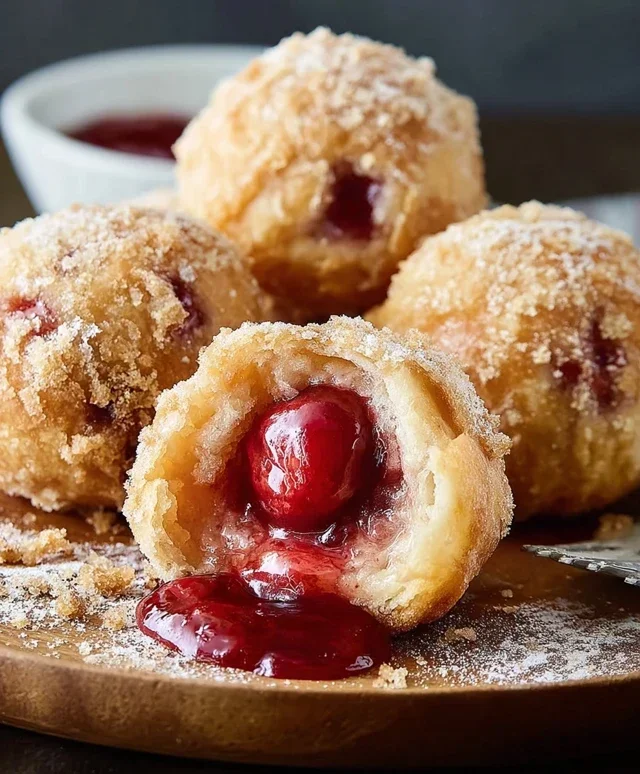
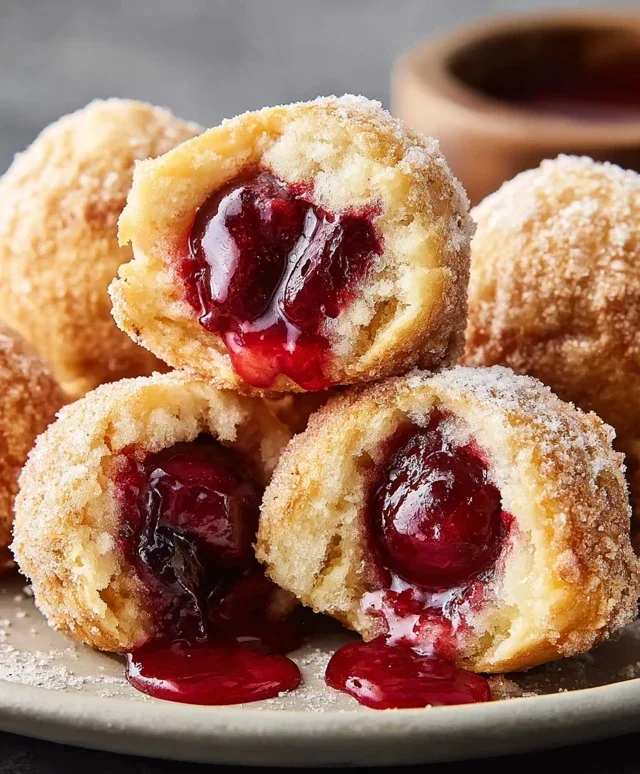
Cherry Pie Bombs- Easy Delicious Treat
Cherry Pie Bombs are an absolute revelation for any dessert lover! Forget everything you thought you knew about traditional cherry pie because these little flavor powerhouses are about to steal your heart. Imagin extracte all the luscious, sweet-tart goodness of a classic cherry pie, but condensed into perfectly portioned, bite-sized delights that are both incredibly fun to eat and ridiculously satisfying. What makes these Cherry Pie Bombs so special? It’s the delightful surprise inside each golden-brown crust – a molten core of warm, bubbling cherry filling that bursts with every bite. They’re the perfect treat for parties, potlucks, or even just a special indulgence for yourself. Get ready to fall head over heels for these irresistible Cherry Pie Bombs!
Cherry Pie Bombs
Are you ready for a dessert that’s explosively delicious and incredibly easy to make? Cherry Pie Bombs are exactly what they sound like – miniature bursts of cherry pie goodness, conveniently packaged into delightful, bite-sized treats. These little wonders are perfect for parties, potlucks, or simply when you’re craving a sweet, fruity indulgence. Forget the fuss of traditional pie crusts; we’re using a shortcut that’s a game-changer: canned biscuits! This recipe is designed for maximum flavor with minimal effort, ensuring even the most novice bakers can achieve impressive results. They’re golden brown on the outside, gooey and warm on the inside, and drizzled with a sweet glaze that ties it all together. Let’s dive in and create some edible magic!
Ingredients:
Getting Started: Preparing Your Cherry Pie Bombs
The beauty of Cherry Pie Bombs lies in their simplicity. We’re going to leverage store-bought ingredients to create a homemade taste that will wow your friends and family. First things first, let’s get our workspace ready. You’ll need a clean, flat surface for working with the biscuits and a sturdy pot or deep skillet for frying. Ensure you have enough space for all your ingredients and tools.
Assembling the Bombs
This is where the magic begin extracts! We’ll take our Grands “Big” biscuits and transform them into the perfect vessels for our cherry pie filling. Open the can of biscuits and carefully separate each one. You’ll notice they’re quite large, which is exactly what we want. Gently flatten each biscuit, being careful not to tear it. Think of it like creating a small disc. Once flattened, we’re going to spoon a generous amount of cherry pie filling into the center of each biscuit. Don’t be shy with the filling – it’s the star of the show! Now, carefully fold the edges of the biscuit dough up and around the filling, pinching them together to completely enclose it. You want to create a senon-alcoholic aled ball, much like you would when making dumplings or empanadas. The goal is to prevent the filling from leaking out during the frying process. If any edges seem a bit thin or prone to splitting, gently press them together again. You should end up with several little cherry-filled dough balls.
Frying to Golden Perfection
Now comes the exciting part: frying! You’ll need a deep pot or a heavy-bottomed skillet. Pour in enough vegetable oil to generously cover the cherry pie bombs. We want to ensure they fry evenly and get that beautiful golden-brown color. Heat the oil over medium heat. A good temperature to aim for is around 350°F (175°C). If you don’t have a thermometer, you can test the oil by dropping a tiny piece of biscuit dough into it. If it sizzles immediately and floats to the surface, your oil is ready. Carefully, and I mean very carefully, lower a few cherry pie bombs into the hot oil. Don’t overcrowd the pot; fry them in batches to maintain the oil temperature and ensure even cooking. You’ll want to fry them for about 2-3 minutes per side, or until they are a deep golden brown and puffed up. Use a slotted spoon or spider strainer to gently turn them and remove them from the oil once they’re perfectly cooked. Place the fried bombs on a plate lined with paper towels to absorb any excess oil. This step is crucial for achieving that delightful crispy exterior.
Whipping Up the Sweet Glaze
While our Cherry Pie Bombs are cooling slightly, let’s prepare the irresistible glaze that will take them to the next level. In a medium bowl, combine the powdered sugar, milk, and light corn syrup. The corn syrup is important here as it adds a subtle sheen and helps prevent the glaze from hardening too quickly. Whisk everything together until you have a smooth, lump-free glaze. You’re looking for a consistency that’s thick enough to coat the bombs but thin enough to drizzle easily. If the glaze seems too thick, add milk a teaspoon at a time until you reach your desired consistency. If it’s too thin, add a bit more powdered sugar. This glaze is the perfect sweet counterpoint to the tart cherry filling and the slightly savory biscuit dough.
Glazing and Serving Your Cherry Pie Bombs
Once your Cherry Pie Bombs have cooled for a few minutes (you don’t want them to be piping hot, or the glaze will just melt off), it’s time to get drizzling! You can either dip the bombs into the glaze or, for a more decorative look, use a spoon or a piping bag to drizzle the glaze over the tops. Either way, be generous! The sweet, creamy glaze mingling with the warm, fruity filling and the slightly crisp biscuit exterior is pure bliss. Serve your Cherry Pie Bombs warm. They are best enjoyed fresh, but any leftovers can be stored in an airtight container at room temperature for a day or two. Reheating them gently in a toaster oven or microwave can bring back some of their origin extractal warmth and gooeyness. Enjoy these delightful little explosions of flavor!
Conclusion:
There you have it! These Cherry Pie Bombs are an absolute delight, offering all the comforting flavors of classic cherry pie in a perfectly portioned, incredibly easy-to-make bite. The beauty of this recipe lies in its simplicity and the incredible burst of sweet, tart cherry goodness encased in flaky pastry. They’re fantastic for any occasion, from a casual afternoon treat to a crowd-pleasing dessert at your next gathering. Imagin extracte serving these warm, with a scoop of vanilla ice cream melting into the gooey center – pure bliss!
I highly encourage you to give these Cherry Pie Bombs a try. Don’t be intimidated; they’re surprisingly straightforward. Feel free to get creative with variations too! Perhaps try a splash of almond extract in the filling for a nutty twist, or experiment with different types of berries alongside the cherries. You could even add a sprinkle of cinnamon to the dough before baking for an extra layer of warmth. These little flavor bombs are sure to become a favorite in your recipe repertoire.
Frequently Asked Questions:
Can I make these Cherry Pie Bombs ahead of time?
Absolutely! You can prepare the unbaked Cherry Pie Bombs and store them in the refrigerator for up to 24 hours before baking. If freezing, it’s best to freeze them unbaked on a baking sheet until solid, then transfer to a freezer-safe container. You’ll need to add a few extra minutes to the baking time if baking from frozen.
What if I don’t have fresh cherries?
No problem at all! You can easily use frozen pitted cherries. Just make sure to thaw them completely and drain off any excess liquid before incorporating them into the filling. Canned cherry pie filling is also a convenient option, though you might want to reduce the sugar slightly as it’s often pre-sweetened.
Cherry Pie Bombs
Deep-fried biscuit bites filled with sweet cherry pie filling and drizzled with a simple glaze.
Ingredients
-
Vegetable oil, for frying
-
16.3 ounces Grands “Big” biscuits, flaky
-
21 ounces cherry pie filling
-
2 cups powdered sugar
-
1/4 cup milk
-
1 tablespoon light corn syrup
Instructions
-
Step 1
Open the Grands “Big” biscuits and separate them. Flatten each biscuit slightly. -
Step 2
Place a spoonful of cherry pie filling in the center of each flattened biscuit. Fold the edges of the biscuit around the filling to create a sealed ball, pinching to ensure it’s closed. -
Step 3
Heat vegetable oil in a deep pot or Dutch oven over medium-high heat to about 350°F (175°C). -
Step 4
Carefully place the cherry pie bombs into the hot oil, frying in batches. Fry for 2-3 minutes per side, or until golden brown and puffed. -
Step 5
Remove the fried cherry pie bombs with a slotted spoon and drain on paper towels. -
Step 6
While the bombs are cooling slightly, whisk together the powdered sugar, milk, and light corn syrup in a bowl until smooth to create the glaze. -
Step 7
Drizzle the glaze over the warm cherry pie bombs.
Important Information
Nutrition Facts (Per Serving)
It is important to consider this information as approximate and not to use it as definitive health advice.
Allergy Information
Please check ingredients for potential allergens and consult a health professional if in doubt.