Dark Chocolate Sea Salt Nut Bars – Easy Recipe
Dark Chocolate and Sea Salt Nut Bars are an absolute revelation for anyone seeking a satisfyingly decadent yet surprisingly wholesome treat. I’ve always been drawn to the perfect balance of sweet and salty, and these bars deliver it in spades. Imagin extracte the rich, intense flavor of premium dark chocolate melting alongside the delightful crunch of toasted nuts, all elevated by those little bursts of flaky sea salt. It’s this interplay of textures and tastes that makes them so utterly irresistible. They’re not just a snack; they’re a moment of pure indulgence, a little pick-me-up that feels both luxurious and grounding. What truly sets these Dark Chocolate and Sea Salt Nut Bars apart is their simplicity, allowing the quality of the ingredients to shine. Whether you’re craving something for an afternoon energy boost or a delightful dessert, these Dark Chocolate and Sea Salt Nut Bars are guaranteed to hit the spot and leave you wanting more.
Ingredients:
Crafting Your Own Dark Chocolate and Sea Salt Nut Bars
There’s something incredibly satisfying about homemade snacks, isn’t there? Especially when they’re as delicious and texturally delightful as these Dark Chocolate and Sea Salt Nut Bars. These aren’t just any granola bars; they’re a sophisticated treat that perfectly balances the rich intensity of dark chocolate with the satisfying crunch of nuts and a whisper of sea salt. They’re the perfect grab-and-go breakfast, an afternoon pick-me-up, or even a healthier dessert option. I love making a batch of these over the weekend to have on hand for the busy week ahead. They’re surprisingly simple to make, requiring no baking, which is always a bonus in my book! Let’s get started on creating these little powerhouses of flavor.
Preparing the Foundation
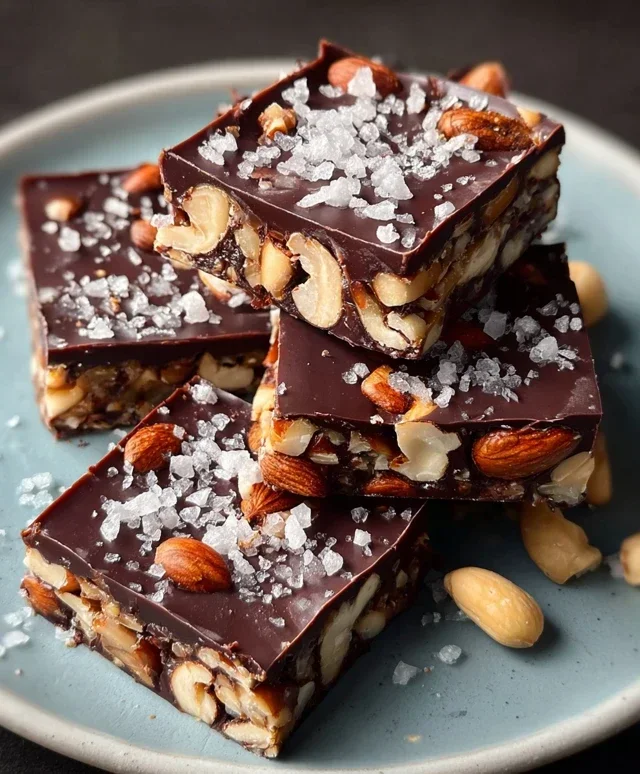
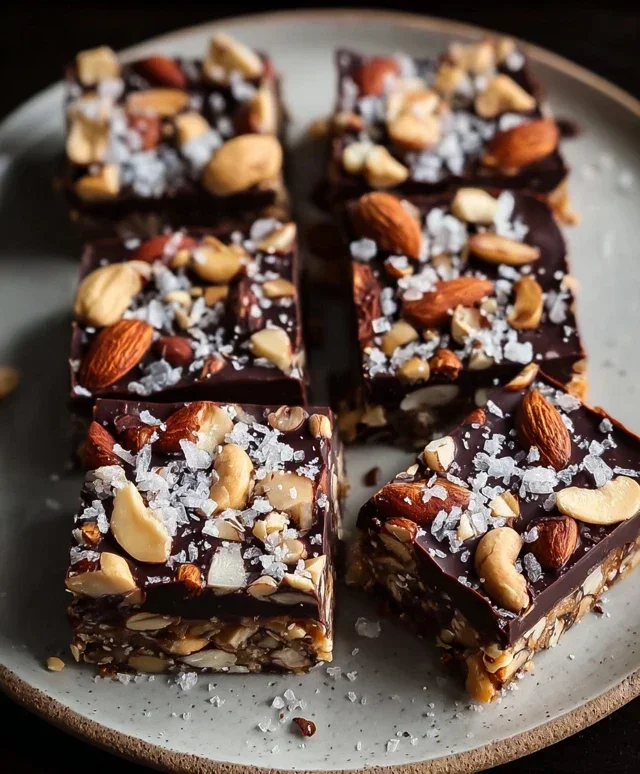
The secret to a great nut bar lies in the quality and variety of your nuts. For this recipe, I’ve found a combination of cashews, peanuts, and almonds provides a wonderful medley of textures and flavors. The cashews offer a creamy undertone, the peanuts bring a classic nutty robustness, and the almonds contribute a satisfying crispness. Feel free to experiment with your favorites – walnuts, pecans, or even macadamia nuts would be fantastic additions. The key is to have a good mix!
Mixing the Sweet and Salty
In a large bowl, combine your chosen nuts with the puffed rice. The puffed rice adds a lightness and a delightful airy crunch that contrasts beautifully with the denser nuts. Next, we’ll introduce the binding agents and flavor enhancers. Pour in the brown rice syrup, which acts as our sticky sweetener. It’s less processed than refined sugars and offers a lovely caramel-like note. Follow this with the vanilla extract, a tiny but mighty flavor booster that elevates all the other ingredients. Finally, sprinkle in the sea salt. Don’t skip this! The sea salt is crucial for cutting through the sweetness of the chocolate and syrup, making the overall flavor profile so much more interesting and balanced.
Forming the Bars
Now, it’s time to bring everything together. Gently stir the wet ingredients into the dry ingredients until everything is well coated. You want to ensure that every nut and puff of rice has a little bit of that syrupy goodness clingin extractg to it. Be careful not to overmix, as we want to maintain the integrity of the puffed rice.
Transfer the mixture into a parchment-lined baking dish. An 8×8 inch square pan works perfectly for this. Press the mixture down firmly and evenly into the pan. This is a really important step for ensuring your bars hold their shape once set. I like to use the bottom of a glass or a flat spatula to really compact the mixture. The more compact it is, the less likely your bars are to crum extractble.
The Chocolatey Crown
This is where the magic truly happens! In a heatproof bowl, combine the dark chocolate chips and the coconut oil. Coconut oil is essential here because it helps the chocolate melt smoothly and creates a beautiful, glossy finish that hardens perfectly. Place this bowl over a saucepan of simmering water, creating a makeshift double boiler. Stir occasionally until the chocolate is completely melted and smooth. Avoid getting any water into the chocolate, as this can cause it to seize.
Once your chocolate is beautifully melted, pour it evenly over the pressed nut mixture in the baking dish. Use an offset spatula or the back of a spoon to spread the chocolate so it covers the entire surface. For an extra touch of gourmet flair, and if you have it on hand, now is the perfect time to sprinkle a little flaky sea salt over the melted chocolate. This adds little bursts of salty crunch that are simply divine.
Chilling to Perfection
Now for the hardest part: waiting! Place the baking dish in the refrigerator and let it chill for at least 2 hours, or until the chocolate has completely set and the bars are firm. This chilling period is essential for allowing the brown rice syrup to firm up and hold everything together. Once chilled, lift the entire slab out of the pan using the parchment paper.
Place the slab on a cutting board and use a sharp knife to cut it into your desired bar shapes. I usually aim for about 12-16 bars, depending on how generous I want to be! Store your finished Dark Chocolate and Sea Salt Nut Bars in an airtight container in the refrigerator. They’ll stay delicious for up to a week. Enjoy!
Conclusion:
I hope you’re as excited about these Dark Chocolate and Sea Salt Nut Bars as I am! They’re the perfect blend of rich, decadent dark chocolate, crunchy toasted nuts, and that addictive pop of sea salt. These bars are incredibly versatile, making them a fantastic treat for any occasion. Whether you need a pick-me-up during a busy workday, a post-workout energy boost, or a satisfying dessert that’s surprisingly easy to make, these bars deliver. The balance of sweet and salty, combined with the satisfying chegrape juicess and crunch, is truly irresistible.
I love enjoying these bars as a quick breakfast on the go, a delightful afternoon snack, or even a healthier indulgence after dinner. Feel free to experiment with different nut combinations – almonds, walnuts, pecans, or even a mix would be delicious. You could also add a sprinkle of chili flakes for a subtle kick or a dash of cinnamon for warmth. Don’t be afraid to get creative! I truly encourage you to give these Dark Chocolate and Sea Salt Nut Bars a try; I’m confident you’ll love them as much as I do.
Frequently Asked Questions:
Can I make these bars vegan?
Absolutely! To make these bars vegan, simply ensure you use dairy-free dark chocolate. Many dark chocolate brands are naturally vegan, but it’s always good to check the ingredients list for milk or butter. You can also substitute honey with agave nectar or maple syrup for a vegan sweetener.
How should I store these bars?
These bars can be stored in an airtight container at room temperature for up to a week. If your kitchen tends to be warm, or if you prefer a firmer bar, you can store them in the refrigerator. They will keep well for about two weeks in the fridge.
Can I substitute the nuts?
Yes, definitely! Feel free to use any nuts you prefer. Almonds, walnuts, pecans, cashews, or even a combination would work wonderfully. Toasting them beforehand enhances their flavor and crunch, which is highly recommended for the best results.
Dark Chocolate and Sea Salt Nut Bars
Delicious and easy no-bake bars packed with nuts, puffed rice, and dark chocolate, finished with a touch of sea salt.
Ingredients
-
2 1/2 cups unsalted nuts (3/4 cup cashews, 3/4 cup peanuts, 1 cup almonds)
-
1/2 cup puffed rice
-
1/4 cup brown rice syrup
-
1 1/2 teaspoon vanilla extract
-
1/2 teaspoon sea salt
-
1 cup dark chocolate chips
-
2 teaspoons coconut oil
-
Optional: flaky salt for topping
Instructions
-
Step 1
Line an 8×8 inch baking pan with parchment paper, leaving an overhang. -
Step 2
In a large bowl, combine the nuts and puffed rice. Stir well. -
Step 3
In a small saucepan, gently heat the brown rice syrup, vanilla extract, and 1/2 teaspoon sea salt until warm. Do not boil. -
Step 4
Pour the warm syrup mixture over the nut and puffed rice mixture. Stir until everything is evenly coated. -
Step 5
Press the mixture firmly and evenly into the prepared baking pan. -
Step 6
In a microwave-safe bowl, melt the dark chocolate chips and coconut oil in 30-second intervals, stirring in between, until smooth. -
Step 7
Pour the melted chocolate over the nut mixture, spreading it evenly. Sprinkle with optional flaky salt, if desired. -
Step 8
Refrigerate for at least 30 minutes, or until the chocolate is set. -
Step 9
Once set, use the parchment paper overhang to lift the slab out of the pan. Cut into bars.
Important Information
Nutrition Facts (Per Serving)
It is important to consider this information as approximate and not to use it as definitive health advice.
Allergy Information
Please check ingredients for potential allergens and consult a health professional if in doubt.