Easy Oreo Milkshake Recipe-Best Treat Ever
Oreo Milkshake recipes are a gateway to pure, unadulterated bliss, a velvety dream in a glass that has captured hearts (and taste buds!) worldwide. There’s something undeniably magical about the way those crunchy, chocolatey cookies transform into a smooth, decadent elixir. We all have our comfort foods, and for so many of us, an Oreo Milkshake reigns supreme. It’s the perfect antidote to a long day, a celebratory treat, or simply a spontaneous moment of delicious indulgence. What makes this classic so special? It’s that perfect balance of sweet vanilla ice cream and the intense, satisfying crunch and flavor of crushed Oreos, all blended into a creamy, dreamy consistency that’s simply irresistible. Get ready to create your own version of this beloved frozen delight!
Oreo Milkshake: The Ultimate Comfort Treat
There are few desserts that evoke such pure, unadulterated joy as a classic Oreo milkshake. It’s the perfect blend of creamy, sweet, and chocolatey goodness, with those iconic cookie crum extractbles providing a delightful textural contrast. Whether you’re looking for a quick pick-me-up, a special treat for the kids, or just a way to indulge your sweet tooth, this Oreo milkshake is your answer. It’s incredibly easy to make, requiring minimal ingredients and effort, yet the result is consistently impressive. Forget those store-bought versions that often lack the authentic taste and texture; making your own allows you to control the sweetness, the thickness, and the all-important Oreo-to-ice-cream ratio.
This recipe is a celebration of simplicity and flavor. It’s the kind of dessert that brings smiles to faces and creates lasting memories, perfect for a lazy afternoon, a movie night, or just when that craving hits hard. The beauty of this milkshake lies in its adaptability. While this is the classic rendition, I’ll offer some suggestions on how you can customize it to your liking later on. But for now, let’s focus on mastering the fundamental, incredibly delicious Oreo milkshake.
Ingredients:
Crafting Your Perfect Oreo Milkshake
Now, let’s get down to the delightful process of creating this creamy concoction. The key to a truly magnificent milkshake is the quality of your ingredients and the technique you employ. Don’t rush the process; savor each step as you build towards that ultimate creamy finish.
Step 1: Preparing the Ice Cream Base
Start by gathering your vanilla ice cream. It’s crucial that the ice cream is softened slightly, but not completely melted. If it’s too hard, it will make blending difficult and result in a chunky, less smooth milkshake. On the other hand, if it’s too soft, your milkshake will be too thin. I usually leave my ice cream out on the counter for about 10-15 minutes before I start. This allows it to reach that perfect creamy, scoopable consistency. You’ll want about 1 ½ cups of this lovely, yielding ice cream. Place this into your blender.
Step 2: Adding the Liquid Element
Next, it’s time to introduce the milk. For the creamiest milkshake, I always recommend using whole milk. It contributes to a richer texture and a more decadent flavor profile. However, if you prefer a lighter option, 2% milk or even a non-dairy milk like almond or oat milk can be used, though the texture might be slightly different. You’ll need ½ cup of milk. Pour this gently over the softened ice cream in the blender. At this stage, you can also add the optional tablespoon of granulated sugar if you have a particularly sweet tooth or if your ice cream isn’t very sweet. I generally find that the sweetness from the Oreos is enough, but it’s always good to have the option.
Step 3: Incorporating the Star of the Show – The Oreos!
This is where the magic really begin extracts. Take your 6 Oreo cookies and give them a good, rough chop. You don’t need to crush them into a fine powder; some larger chunks are desirable for that satisfying cookie crunch within the smooth milkshake. You can do this by hand, placing them in a zip-top bag and gently crushing them with a rolling pin or the heel of your hand, or you can pulse them a few times in a food processor if you prefer. Aim for a mix of smaller crum extractbs and slightly larger pieces. Add these chopped Oreos directly into the blender with the ice cream and milk.
Step 4: The Blending Process
Now, secure the lid on your blender. Begin extract blending on a low speed, gradually increasing to a medium speed. You want to blend until the mixture is smooth and creamy, with no large ice cream chunks remaining. However, be careful not to over-blend. Over-blending can introduce too much air into the milkshake, making it foamy and less thick. It can also start to melt the ice cream too much, leading to a thinner consistency. You should see the Oreos becoming incorporated, creating those signature dark swirls throughout the milkshake. Blend just until everything comes together beautifully. This usually takes about 30-60 seconds, depending on your blender.
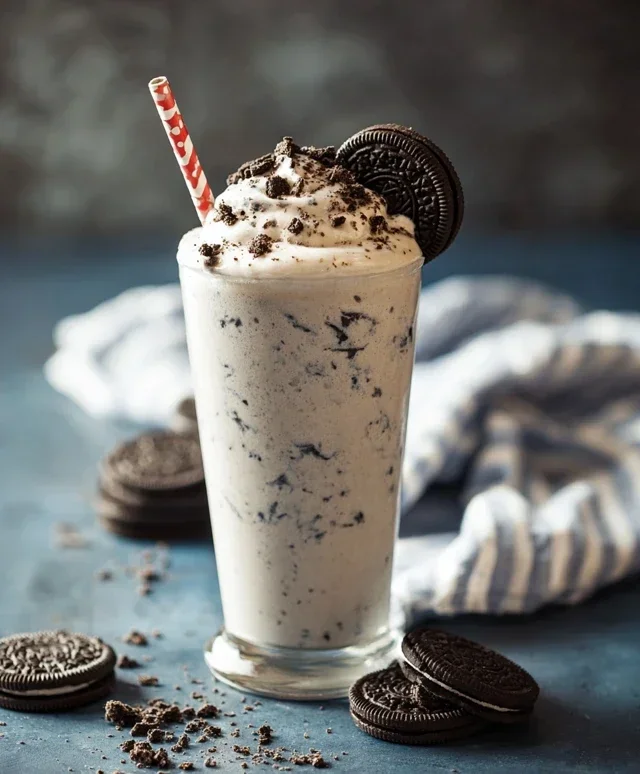
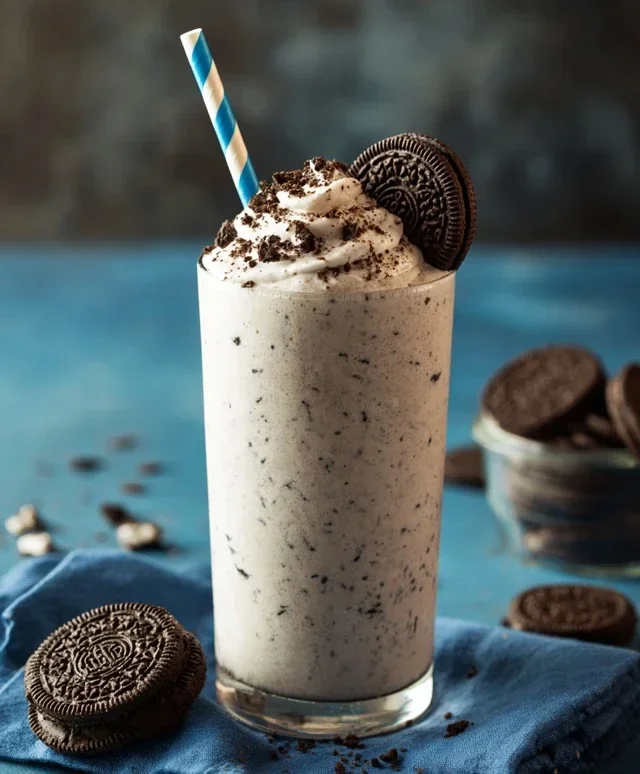
Step 5: Pouring and Garnishing Your Masterpiece
Once blended to perfection, it’s time to pour your glorious Oreo milkshake. Grab your favorite tall glass. Carefully pour the thick, creamy mixture into the glass. Look at those beautiful swirls of Oreo goodness! For an extra touch of indulgence, you can top your milkshake with a generous swirl of whipped cream. This adds another layer of creamy texture and a visually appealing finish. If you’re feeling extra fancy, sprinkle some crushed Oreo cookies over the whipped cream for added crunch and a final nod to the star ingredient. Serve immediately with a straw and enjoy every single sip of this heavenly treat!
Conclusion:
There you have it – your guide to crafting the ultimate Oreo Milkshake! This recipe is truly a winner because it’s incredibly simple to make, requiring just a handful of common ingredients, yet delivers an explosion of decadent, creamy, and satisfying chocolatey flavor. It’s the perfect treat for any occasion, whether you’re craving a quick dessert, celebrating a special moment, or simply looking to indulge your sweet tooth. The delightful crunch of the Oreos combined with the smooth, rich ice cream creates a texture experience that’s simply irresistible.
To elevate your Oreo Milkshake experience, consider these serving suggestions: pour it into a tall, chilled glass and top generously with whipped cream, a sprinkle of crushed Oreos, and perhaps even a drizzle of chocolate syrup. For a truly festive touch, add a maraschino cherry. Don’t be afraid to get creative with variations! You can swap out vanilla ice cream for chocolate or cookies ‘n cream for an even more intense chocolatey flavor. Add a shot of espresso for a coffee-infused kick, or a spoonful of peanut butter for a nutty twist. The possibilities are endless!
I truly encourage you to give this Oreo Milkshake recipe a try. It’s a guaranteed crowd-pleaser and so easy to customize to your liking. Enjoy every delicious sip!
Frequently Asked Questions:
Q: Can I make this Oreo Milkshake without ice cream?
While the classic recipe relies on ice cream for its signature creaminess and chill, you can create a lighter version. For a dairy-free or less indulgent option, try blending frozen bananas with your Oreos and a splash of plant-based milk until smooth. The result will be a different texture, more like a smoothie, but still wonderfully chocolatey and delicious.
Q: How many Oreos should I use for the best flavor?
The recipe calls for a good amount of Oreos to ensure that characteristic flavor and texture throughout. However, you can absolutely adjust this to your preference. If you love a strong Oreo flavor, feel free to add a few extra cookies. For a more subtle hint, you can reduce them slightly. Remember to save a few to crush for topping!
Oreo Milkshake
A classic and indulgent Oreo milkshake, perfect for a sweet treat.
Ingredients
-
1 cup milk
-
1.5 cups vanilla ice cream
-
6 Oreo cookies, crushed
-
1 tablespoon chocolate syrup
-
Whipped cream for topping
Instructions
-
Step 1
Add milk to the blender. -
Step 2
Add vanilla ice cream to the blender. -
Step 3
Add crushed Oreo cookies to the blender. -
Step 4
Add chocolate syrup to the blender. -
Step 5
Blend until smooth and creamy. -
Step 6
Pour into a glass. -
Step 7
Top with whipped cream and a drizzle of chocolate syrup if desired.
Important Information
Nutrition Facts (Per Serving)
It is important to consider this information as approximate and not to use it as definitive health advice.
Allergy Information
Please check ingredients for potential allergens and consult a health professional if in doubt.