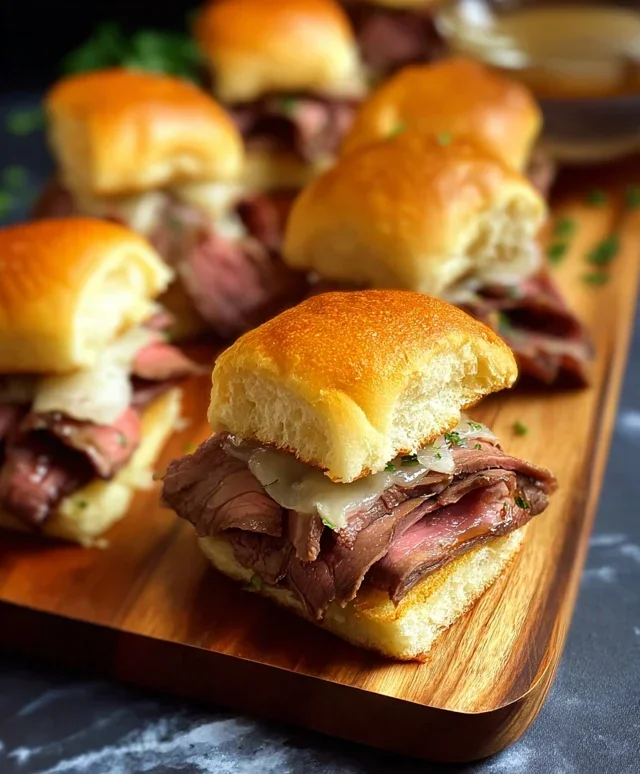
Juicy Roast Beef Sliders- Easy Party Appetizer
Roast beef sliders are the ultimate crowd-pleaser, perfect for game days, casual gatherings, or even just a delicious weeknight treat. We all know that sinking feeling when you want something satisfying, something that hits all the right notes, but you don’t want the fuss of a full-sized meal. That’s where these miniature marvels come in! The magic of roast beef sliders lies in their irresistible combination of tender, savory roast beef, nestled in soft, pillowy buns, often elevated with a creamy sauce and a hint of crispness. They’re approachable, customizable, and undeniably delicious. Forget dry, bland sliders; these are designed to pack a flavorful punch in every bite, making them an instant favorite for anyone lucky enough to snag one.
Why You’ll Love These Roast Beef Sliders
The Perfect Bite-Sized Indulgence
Roast Beef Sliders: Your New Go-To Appetizer or Weeknight Dinner
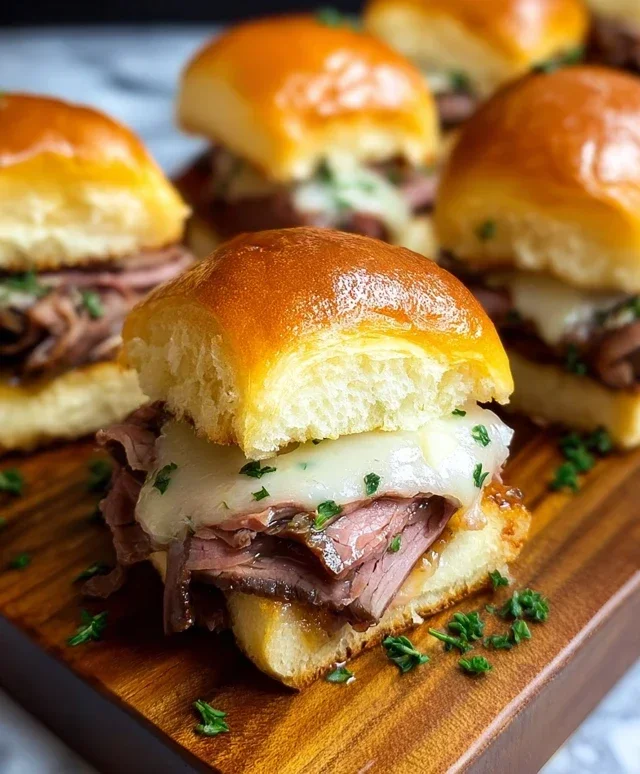
There are few things more satisfying than a perfectly crafted slider. These miniature marvels pack all the flavor of a full-sized sandwich into a delightfully bite-sized package. Today, we’re diving into a recipe that elevates the humble slider to gourmet status: Roast Beef Sliders with Caramelized Onions. Imagin extracte tender, thinly sliced roast beef piled high on soft, slightly sweet slider rolls, topped with melty white cheese and a generous helping of slow-cooked, deeply flavorful caramelized onions. These aren’t your average party snacks; these are flavor bombs that will have everyone asking for seconds, or even thirds!
Whether you’re planning a game day spread, a casual dinner party, or simply craving a delicious and easy meal, these roast beef sliders are an absolute winner. The magic lies in the simple yet powerful combination of quality ingredients and a little bit of patience to develop those rich, savory flavors. Let’s get started on creating these irresistible mini sandwiches.
Ingredients:
Caramelizing the Onions: The Flavor Foundation
The secret to truly incredible roast beef sliders lies in the deeply savory and sweet caramelized onions. This step requires a bit of patience, but the payoff is immense. Don’t rush this process; slow and steady heat is key to unlocking the natural sugars in the onions and transforming them into a rich, jammy topping.
1. Prepare the Onions: Begin extract by thinly slicing your four large onions. The thinner the slices, the more evenly they will cook and caramelize. In a large, heavy-bottomed skillet or Dutch oven, melt 3 tablespoons of unsalted butter over medium-low heat. Once the butter is melted and shimmering, add the sliced onions. Stir them well to coat them in the butter.
2. Slow and Steady Cooking: This is where the magic happens. Cook the onions over medium-low heat, stirring occasionally. Initially, they will soften and release their moisture. As they begin extract to turn translucent, you’ll notice them starting to brown. This process can take anywhere from 30 to 45 minutes, or even longer, depending on your stovetop and the thickness of your onion slices. Resist the urge to crank up the heat; high heat will scorch the onions before they have a chance to caramelize properly. If you see any sticking to the bottom of the pan, you can deglaze with a tablespoon or two of water or broth. The goal is a rich, golden-brown color and a sweet, tender texture. About 10 minutes before the onions are finished caramelizing, add the finely minced garlic and chopped rosemary to the skillet. Continue to cook, stirring frequently, until the garlic is fragrant and the rosemary has released its aroma, about 2-3 minutes more. Set the caramelized onions aside.
Assembling and Baking the Sliders
With our flavorful caramelized onions ready, it’s time to bring these sliders to life. This part is quick and satisfying, and soon you’ll be enjoying the fruits of your labor.
3. Prepare the Slider Rolls and Roast Beef: While your onions are caramelizing, you can prepare your slider rolls. If you’re using rolls that are connected, slice them in half horizontally using a serrated knife. If you’re using individual slider buns, simply slice them in half. Arrange the bottom halves of the rolls on a large baking sheet. Generously pile the thinly sliced or shaved deli roast beef onto the bottom halves of the rolls. Don’t be shy; we want a substantial amount of delicious roast beef in every bite.
4. Adding Cheese and Onions: Layer the slices of white cheese over the roast beef. I like to use Havarti for its mild, creamy flavor and excellent melting capabilities, but Provolone or Swiss are also fantastic choices. Once the cheese is in place, spoon a generous amount of your beautifully caramelized onions over the cheese. Ensure each slider gets a good portion of those sweet, savory onions.
5. Creating the Garlic-Herb Butter Topping: In a small bowl, combine the ¼ cup of melted unsalted butter with the mustard powder, garlic powder, and chopped parsley. Stir until well combined. This aromatic butter mixture will be brushed over the tops of the slider rolls, infusing them with extra flavor and helping them to crisp up beautifully in the oven.
6. Baking to Perfection: Place the top halves of the slider rolls over the assembled sliders. Brush the garlic-herb butter mixture generously over the tops of all the slider rolls. This is what will give them that irresistible golden sheen and extra layer of deliciousness. Place the baking sheet in a preheated oven at 350°F (175°C). Bake for 10-15 minutes, or until the cheese is melted and gooey, and the tops of the rolls are lightly golden and toasted.
7. Serve and Enjoy: Once baked to perfection, carefully remove the sliders from the oven. Let them rest for just a minute or two before serving. These roast beef sliders are best enjoyed warm, when the cheese is perfectly melted and the flavors have melded together. You can serve them whole, or slice them in half for easier handling. These are perfect for a crowd, or simply as a satisfying meal for yourself. Enjoy every bite of these flavor-packed mini sandwiches!
Conclusion:
So there you have it – a truly delightful way to enjoy classic roast beef in a convenient, crowd-pleasing format! These roast beef sliders are a guaranteed hit for any occasion, whether you’re hosting a game day party, planning a casual get-together, or simply craving a delicious and satisfying meal. The combination of tender roast beef, flavorful toppings, and soft slider buns makes for an incredibly satisfying bite. They’re so easy to assemble, making them perfect for even novice cooks. Don’t hesitate to get creative with your toppings – the possibilities are endless! I highly encourage you to give this recipe a try; you won’t be disappointed!
For serving, these sliders are fantastic on their own, but they also pair beautifully with a side of crispy fries, a fresh salad, or even a creamy coleslaw. For variations, consider adding a sharp cheddar or provolone cheese, a drizzle of horseradish sauce, caramelized onions, or even some pickled jalapeños for a spicy kick. Whatever you choose, these roast beef sliders are sure to become a favorite!
Frequently Asked Questions:
Can I make the roast beef ahead of time for these sliders?
Absolutely! Preparing the roast beef in advance is a great time-saver. You can roast your beef a day or two before and store it, thinly sliced, in an airtight container in the refrigerator. Simply warm it gently before assembling your sliders.
What kind of roast beef is best for sliders?
A good quality deli-sliced roast beef works wonderfully and is the easiest option. Alternatively, you can roast your own beef chuck or sirloin and slice it thinly yourself. Aim for a cut that’s tender and flavorful when cooked.
Are there any dairy-free options for these roast beef sliders?
Yes! If you’re looking for a dairy-free option, simply omit any cheese and use a dairy-free spread or sauce. Many slider buns are also dairy-free, so just check the ingredients. The core roast beef and bun combination is already delicious on its own!
Roast Beef Sliders
Easy and delicious roast beef sliders featuring caramelized onions and your favorite cheese, perfect for gatherings or a quick meal.
Ingredients
-
12 slider rolls
-
1 ½ pounds deli roast beef, thinly sliced or shaved
-
4-6 slices white cheese
-
3 tablespoons unsalted butter
-
4 large onions, sliced
-
2 cloves garlic, finely minced
-
1 tablespoon fresh rosemary, chopped
-
¼ cup unsalted butter, melted
-
1 teaspoon mustard powder
-
1 teaspoon garlic powder
-
1 tablespoon parsley, chopped
Instructions
-
Step 1
Melt 3 tablespoons of butter in a large skillet over medium heat. Add the sliced onions and cook slowly, stirring occasionally, until deeply caramelized and tender, about 20-30 minutes. Add the minced garlic during the last 5 minutes of cooking. -
Step 2
While onions are caramelizing, preheat your oven to 350°F (175°C). Slice the slider rolls in half horizontally. -
Step 3
In a small bowl, whisk together the melted butter, mustard powder, garlic powder, chopped rosemary, and chopped parsley. Brush this mixture evenly over the cut sides of the slider rolls. -
Step 4
Arrange the bottom halves of the slider rolls on a baking sheet. Layer the roast beef evenly over the bottom rolls, followed by the caramelized onions and garlic. Top with the cheese slices. -
Step 5
Place the top halves of the slider rolls over the cheese. Cover the baking sheet loosely with foil. -
Step 6
Bake for 10-15 minutes, or until the cheese is melted and the rolls are lightly toasted. For crispier tops, remove the foil for the last 5 minutes of baking. -
Step 7
Slice the sliders apart and serve immediately.
Important Information
Nutrition Facts (Per Serving)
It is important to consider this information as approximate and not to use it as definitive health advice.
Allergy Information
Please check ingredients for potential allergens and consult a health professional if in doubt.