The Best Country Fried Chicken Recipe – Crispy
Country fried chicken is more than just a meal; it’s a warm hug on a plate, a symphony of textures and flavors that transports us back to simpler times. We all have those iconic dishes that evoke childhood memories, and for many, that dish is perfectly executed country fried chicken. What is it about this golden-brown, crispy-on-the-outside, incredibly juicy-on-the-inside classic that makes it so universally beloved? It’s the satisfying crunch of the seasoned flour coating giving way to tender, succulent meat, a contrast that’s simply irresistible. The magic lies in the technique, the careful dredgin extractg, and the proper frying temperature that ensures that iconic crispiness without drying out the chicken. This isn’t just about frying chicken; it’s about creating an experience, a comforting culinary embrace that satisfies the soul.

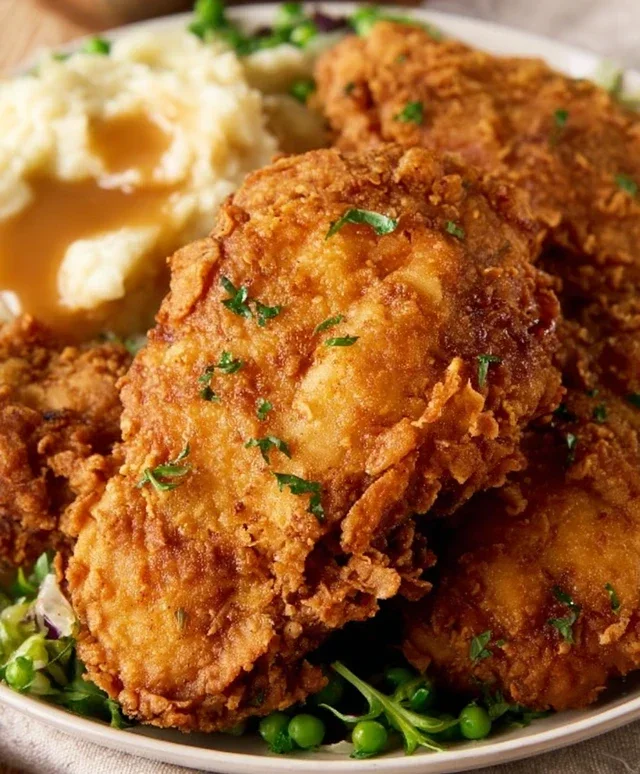
Country Fried Chicken
There’s something undeniably comforting about a plate piled high with golden-brown, crispy country fried chicken. It’s a classic for a reason – that perfect balance of crunchy coating and juicy, tender chicken is a taste of home, no matter where you are. This recipe focuses on achieving that irresistible texture and flavor, making it a dish that will impress your family and friends, or just make for a wonderfully satisfying meal for yourself. We’re going to break down the process into simple, manageable steps, ensuring even novice cooks can achieve restaurant-worthy results. Get ready to transform simple ingredients into a culinary masterpiece.
Ingredients:
Preparing the Chicken for Frying
The first crucial step in achieving perfectly fried chicken is preparing the chicken itself. We’ll start by trimming any excess fat from the chicken breasts. Then, for even cooking and a more manageable size for frying, I like to cut each chicken breast into two or three pieces. This ensures that the chicken cooks through evenly and develops a beautiful crust all around. Don’t worry about making them perfectly uniform; a little variation adds to the rustic charm.
Next, we move on to the crucial brining process, which is where the buttermilk comes in. In a large bowl, place your chicken pieces. Pour the 2 cups of buttermilk over the chicken, ensuring all pieces are submerged. The buttermilk not only tenderizes the chicken but also adds a subtle tang and helps the flour coating adhere beautifully. Now, whisk in 2 of the teaspoons of salt into the buttermilk. This is your first opportunity to season the chicken from the inside out. Cover the bowl and refrigerate for at least 30 minutes, but for even better results, aim for 2-4 hours, or even overnight. The longer it marinates, the more tender and flavorful your chicken will be.
While the chicken is marinating, let’s prepare our dry coating. In a large, shallow dish or a wide bowl, combine the 1 ½ cups of all-purpose flour, ½ cup of breadcrum extractbs, 2 ½ teaspoons of seasoned salt, ¾ teaspoon of paprika, ½ teaspoon of cayenne pepper, and 1 ½ teaspoon of black pepper. Add the remaining 1 teaspoon of salt to this dry mixture. Stir everything together thoroughly with a whisk or a fork until all the spices and breadcrum extractbs are evenly distributed. This ensures that every piece of chicken gets a consistent coating of flavor. Having the breadcrum extractbs in the flour mixture is a little secret to achieving that extra crispy texture that country fried chicken is famous for.
The Frying Process
Now for the exciting part – the frying! This is where the magic happens and those beautiful golden-brown pieces of chicken emerge. We’ll be using a cast-iron skillet or a heavy-bottomed pan for this. Pour the 1 ½ cups of vegetable oil into your skillet. Heat the oil over medium-high heat until it reaches about 350°F (175°C). You can test if the oil is ready by dropping a tiny pinch of flour into it. If it sizzles immediately and floats to the surface, the oil is at the perfect temperature. If it burns too quickly, reduce the heat slightly; if it just bubbles gently, it needs to heat up more.
This is a crucial step: carefully remove one piece of marinated chicken from the buttermilk, letting any excess drip off. Dredge the chicken piece thoroughly in the seasoned flour mixture, pressing gently to ensure the coating adheres well on all sides. You want a good, thick coating. Shake off any excess flour. Now, carefully place the coated chicken into the hot oil. It’s important not to overcrowd the pan, as this will lower the oil temperature and result in greasy, less crispy chicken. Fry the chicken in batches, if necessary.
Cooking the Chicken to Perfection
Once you’ve placed the chicken in the hot oil, resist the urge to move it for the first 4-5 minutes. This allows the coating to set and develop a sturdy crust. After that initial period, gently turn the chicken pieces using tongs. Continue to fry, turning occasionally, for about 6-8 minutes per side, or until the chicken is golden brown and cooked through. The internal temperature of the chicken should reach 165°F (74°C). A meat thermometer is your best friend here for ensuring doneness. The exact cooking time will vary depending on the thickness of your chicken pieces.
As each batch of chicken is finished, remove it from the skillet and place it on a wire rack set over a baking sheet. This allows excess oil to drain off, keeping the chicken nice and crispy. You can place the finished chicken in a warm oven (around 200°F or 95°C) while you fry the remaining batches to keep it warm. This method ensures that all your chicken is ready to serve at the same time and remains at its best crispy state. Enjoy the incredible aroma filling your kitchen!
Conclusion:
And there you have it! My ultimate guide to crafting perfect, golden-brown country fried chicken right in your own kitchen. This recipe truly shines because it balances a wonderfully crispy, seasoned crust with incredibly juicy, tender chicken. The simple yet effective coating method ensures that every bite is packed with flavor and satisfying crunch, making it a true crowd-pleaser. It’s the kind of comforting, delicious meal that brings everyone to the table.
For serving, I always suggest classic pairings like creamy mashed potatoes, a vibrant coleslaw, or warm, fluffy biscuits. Don’t forget a drizzle of homemade gravy for that extra touch of indulgence! If you’re feeling adventurous, consider a spicy kick by adding cayenne pepper to the flour mixture, or opt for a buttermilk brine for even more tender chicken. This country fried chicken is versatile and always a hit.
I wholeheartedly encourage you to give this recipe a try. It might seem daunting, but by following these steps, you’ll be rewarded with a meal that tastes like it came straight from your favorite diner, but with the love and care only homemade can provide. Enjoy the process and savor every delicious piece!
Frequently Asked Questions:
What kind of chicken is best for country fried chicken?
For this recipe, bone-in pieces like thighs, drum extractsticks, and breasts work wonderfully. They tend to stay juicier during the frying process. You can also use boneless, skinless thighs for a quicker cooking time and equally delicious result.
Can I make country fried chicken ahead of time?
While it’s best enjoyed fresh for optimal crispiness, you can prepare some elements ahead. The chicken can be seasoned and dredged a few hours in advance, then refrigerated. However, frying just before serving will yield the best texture. Leftovers can be reheated in an oven or air fryer to regain some crispness.
How do I prevent my country fried chicken from being greasy?
A few key things help! Ensure your oil is at the correct temperature (around 350°F or 175°C). Don’t overcrowd the pan; fry in batches to maintain oil temperature. After frying, drain the chicken on a wire rack set over a baking sheet rather than paper towels, which can trap steam and make the crust soggy.
Country Fried Chicken
Crispy and flavorful country-style fried chicken, perfect for a classic Southern meal.
Ingredients
-
4 boneless skinless chicken breasts
-
1 ½ cups vegetable oil
-
2 cups buttermilk
-
2 large eggs (whisked)
-
3 teaspoons salt
-
1 ½ cup all-purpose flour
-
½ cup breadcrumbs
-
2 ½ teaspoons seasoned salt
-
¾ teaspoon paprika
-
½ teaspoon cayenne pepper
-
1 ½ teaspoon black pepper
Instructions
-
Step 1
Place chicken breasts between two sheets of plastic wrap and pound to an even ½-inch thickness. -
Step 2
In a shallow dish, whisk together buttermilk and eggs. Add chicken, cover, and refrigerate for at least 1 hour. -
Step 3
In another shallow dish, combine flour, breadcrumbs, seasoned salt, paprika, cayenne pepper, and black pepper. Mix well. -
Step 4
Remove chicken from buttermilk mixture, letting excess drip off. Dredge each piece in the flour mixture, pressing to coat thoroughly. Place coated chicken on a wire rack. -
Step 5
Heat vegetable oil in a large, heavy skillet over medium-high heat until shimmering (about 350°F/175°C). -
Step 6
Carefully place chicken pieces in hot oil, ensuring not to overcrowd the skillet. Fry for 4-6 minutes per side, or until golden brown and cooked through (internal temperature of 165°F/74°C). -
Step 7
Remove chicken from skillet and drain on paper towels. Serve hot.
Important Information
Nutrition Facts (Per Serving)
It is important to consider this information as approximate and not to use it as definitive health advice.
Allergy Information
Please check ingredients for potential allergens and consult a health professional if in doubt.