Chicken Fried Chicken Recipe- Crispy Deliciousness
Chicken Fried Chicken is more than just a meal; it’s a comforting embrace on a plate, a culinary hug that speaks of home and happiness. For so many of us, the mere thought of this iconic Southern staple conjures up images of crispy, golden-brown perfection, a symphony of textures and savory flavors that’s utterly irresistible. Why do we love Chicken Fried Chicken so fiercely? It’s the audacious simplicity, the glorious indulgence, and the way it transforms humble chicken into something truly extraordinary. What makes it so special, you ask? It’s the art of double-dredgin extractg, the perfect frying technique that creates that shatteringly crisp exterior, giving way to tender, juicy chicken within. It’s a dish that’s both satisfying and celebratory, a true testament to the magic that happens when simple ingredients are treated with love and respect. Get ready to create your own masterpiece!
Chicken Fried Chicken
There’s something incredibly comforting about a perfectly executed plate of Chicken Fried Chicken. It’s a dish that evokes feelings of home-style cooking, hearty meals, and pure culinary joy. The crispy, golden-brown exterior giving way to tender, juicy chicken, all smothered in a rich, creamy gravy – it’s a symphony of textures and flavors that’s hard to beat. While it might seem intimidating, making fantastic Chicken Fried Chicken at home is absolutely achievable. Today, I’m going to walk you through my favorite way to make this classic dish, from preparing the chicken to whipping up that essential gravy. Get ready for a recipe that’s destined to become a family favorite!
Ingredients:
Cooking Instructions:
Preparing the Chicken and Dredgin extractg Station:
The first step to amazing Chicken Fried Chicken is getting your chicken ready. We’ll be using thin-sliced chicken breasts. If yours aren’t already thin, you can butterfly them or pound them gently between two pieces of plastic wrap until they’re about 1/2 inch thick. This ensures even cooking and a tender result. Now, let’s set up our dredgin extractg station. In a shallow dish or a pie plate, whisk together 2 cups of flour, baking powder, baking soda, salt, pepper, and garlic powder. The baking powder and baking soda will help create a lighter, crispier coating. In a separate shallow dish, whisk together the buttermilk, the egg, and the hot sauce. The hot sauce adds a subtle kick and also helps tenderize the chicken a bit. Don’t skip the hot sauce, even if you’re sensitive to spice; it’s not about making it hot, but adding depth.
Coating the Chicken:
Now comes the fun part – coating the chicken! Take each thin chicken breast and first dip it into the buttermilk mixture, ensuring it’s fully coated. Let any excess drip off. Then, transfer it to the flour mixture, pressing the flour onto the chicken to create a good, thick coating. You want to make sure every nook and cranny is covered. For an extra crispy coating, some people like to dip it back into the buttermilk and then into the flour again, creating a double dredge. I find a single good dredge is usually sufficient for that perfect crunch, but feel free to experiment! Place the coated chicken pieces on a wire rack set over a baking sheet. Letting them rest for about 10-15 minutes allows the coating to adhere better to the chicken, preventing it from falling off during frying.
Frying the Chicken:
It’s time to get frying! You’ll need a good amount of oil in a heavy-bottomed skillet or Dutch oven. I like to use vegetable oil or canola oil, but peanut oil also works wonderfully. Heat the oil over medium-high heat until it reaches about 350°F (175°C). You can test this by dropping a tiny bit of flour into the oil; it should sizzle immediately. Carefully place a few pieces of coated chicken into the hot oil, being careful not to overcrowd the pan. Overcrowding will lower the oil temperature and result in soggy chicken. Fry the chicken for about 4-5 minutes per side, or until it’s golden brown and cooked through. The internal temperature should reach 165°F (74°C). You can use a meat thermometer to be sure. Once cooked, remove the chicken from the oil and place it on a clean wire rack set over a baking sheet to drain. This allows air to circulate and keeps the chicken crispy. We’ll reserve 1/4 cup of this flavorful frying oil for our gravy.
Making the Creamy Gravy:
No Chicken Fried Chicken is complete without a luscious gravy! In the same skillet you used for frying (after draining most of the oil, leaving about 1/4 cup in the pan), reduce the heat to medium. Whisk in 1/3 cup of flour to the reserved oil. Cook this mixture, stirring constantly, for about 1-2 minutes. This is your roux, and cooking it for a bit removes the raw flour taste. Gradually whisk in the 2 cups of milk, a little at a time, until you have a smooth sauce. Continue to cook, stirring frequently, until the gravy thickens to your desired consistency. Season generously with salt and pepper to taste. Taste and adjust seasonings as needed; this is where you can really make the gravy sing.
Serving Your Masterpiece:
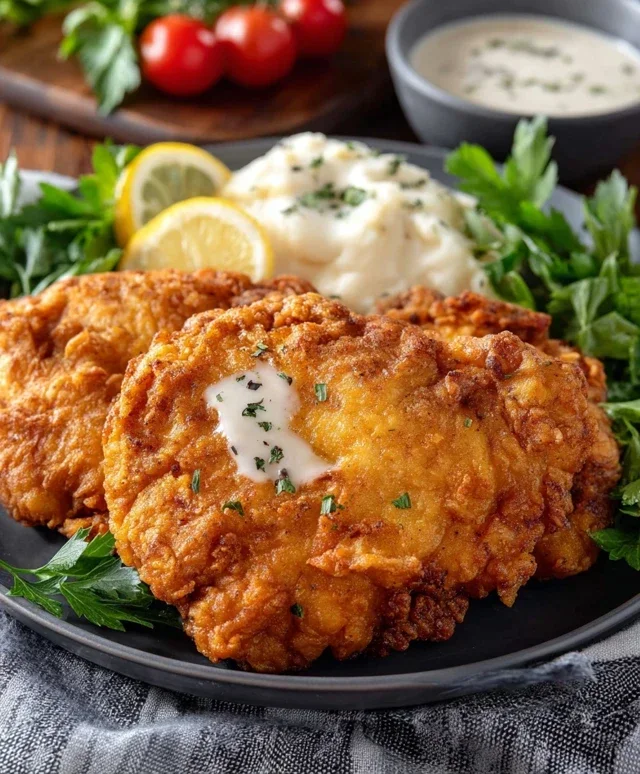
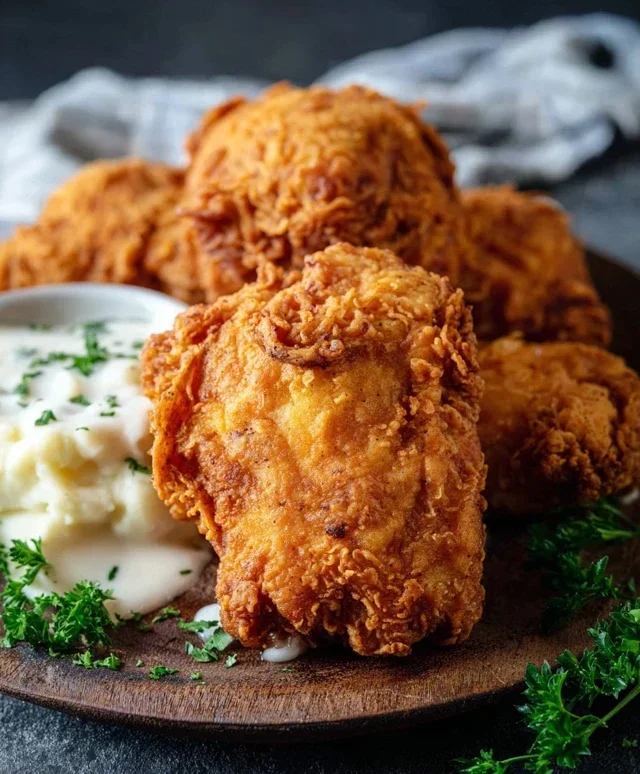
Once the gravy is ready and the chicken is fried to perfection, it’s time to assemble your plates! Arrange the crispy chicken pieces on your serving dishes and generously ladle the warm, creamy gravy over the top. The contrast between the crunchy chicken and the smooth, rich gravy is simply divine. I love serving Chicken Fried Chicken with classic sides like mashed potatoes, green beans, or a simple side salad. This recipe is all about bringin extractg a taste of Southern comfort food right to your own kitchen. Enjoy every delicious bite!
Conclusion:
There you have it – the ultimate guide to crafting a truly exceptional Chicken Fried Chicken right in your own kitchen! This recipe delivers on all fronts: crispy, golden-brown perfection on the outside, tender and juicy chicken on the inside, all enveloped in a rich, savory gravy. It’s a comfort food classic that’s surprisingly achievable and incredibly rewarding to make. The beauty of this dish lies in its simplicity and its ability to bring smiles to the table. Serve it piping hot with your favorite sides like creamy mashed potatoes, buttery corn on the cob, or a crisp green salad to cut through the richness. For a delightful twist, consider a spicy buttermilk brine for an extra kick, or experiment with a herb-infused flour mixture for added depth of flavor.
Don’t be intimidated; I encourage you to give this Chicken Fried Chicken recipe a try. The satisfaction of creating such a beloved dish from scratch is immense, and the taste is simply unparalleled. Get ready for rave reviews from your family and friends!
Frequently Asked Questions:
What is the best type of chicken to use for Chicken Fried Chicken?
For the best results, we recommend using boneless, skinless chicken breasts or thighs. Thighs tend to be more forgiving and stay juicier, while breasts offer a leaner option. Just ensure they are pounded to an even thickness for consistent cooking.
Can I make the gravy ahead of time?
Yes, you absolutely can! The gravy can be made a day in advance and stored in an airtight container in the refrigerator. Gently reheat it on the stovetop over low heat, whisking occasionally, before serving. You may need to add a splash of milk or broth to achieve the desired consistency.
How can I ensure my chicken coating stays crispy?
Key to a crispy coating is ensuring your oil is at the correct temperature (around 350°F or 175°C) and not overcrowding the pan. Fry the chicken in batches, allowing each piece plenty of space. Also, drain the fried chicken on a wire rack set over a baking sheet instead of paper towels, which can steam the bottom and make it soggy.
Chicken Fried Chicken
Crispy, golden chicken breasts coated in a seasoned flour mixture and fried to perfection, served with a creamy milk gravy.
Ingredients
-
6-8 thin sliced chicken breasts
-
2 cups flour
-
2 tsp baking powder
-
1 tsp baking soda
-
1 tsp salt
-
1 tsp pepper
-
1 tsp garlic powder
-
1 1/2 cup buttermilk
-
1 egg
-
1 Tbs hot sauce
-
Oil for frying
-
1/4 cup reserved oil from frying
-
1/3 cup flour
-
2 cup milk
-
Salt & pepper
Instructions
-
Step 1
In a shallow dish, whisk together 2 cups flour, baking powder, baking soda, salt, pepper, and garlic powder. -
Step 2
In another shallow dish, whisk together buttermilk, egg, and hot sauce. -
Step 3
Dip each chicken breast first into the buttermilk mixture, then dredge thoroughly in the seasoned flour mixture, ensuring it’s well coated. Set aside on a plate. -
Step 4
Heat about 1 inch of oil in a large, heavy skillet over medium-high heat until shimmering. -
Step 5
Carefully place chicken breasts into the hot oil, being careful not to overcrowd the pan. Fry for 3-5 minutes per side, or until golden brown and cooked through. -
Step 6
Remove chicken from skillet and drain on paper towels. Reserve 1/4 cup of the frying oil in the skillet. -
Step 7
To make the gravy, whisk 1/3 cup flour into the reserved oil in the skillet over medium heat until a smooth paste forms. Cook for 1 minute. -
Step 8
Gradually whisk in the milk until smooth. Bring to a simmer, stirring constantly, until thickened. Season with salt and pepper to taste. -
Step 9
Serve the fried chicken hot, spooning the milk gravy over the top.
Important Information
Nutrition Facts (Per Serving)
It is important to consider this information as approximate and not to use it as definitive health advice.
Allergy Information
Please check ingredients for potential allergens and consult a health professional if in doubt.